This article introduces the steps I took to set up an environment for hands-on practice with "Web Performance Tuning by Experts."
Having the book on hand will help you better understand the context.
This article covers the environment setup.
We’ll set up the tuning target application (used in ISUCON) on AWS.
※ Note that this will incur charges as we’re not using t-series instances available in the AWS free tier.
I cannot take responsibility for any charges incurred if you follow this article to set up your environment.
Similarly, I cannot be responsible for unauthorized access due to security configuration issues.
Please be extremely careful with the scope of public access.
Target Audience
- Those who want to try performance tuning
- Those who want to quickly set up an ISUCON environment
What You’ll Get from This Article
A method for setting up an environment with the application targeted for performance tuning
Prerequisites
- Repository: https://github.com/catatsuy/private-isu
- To save costs, we’ll use EC2 spot instances
- You already have an AWS account
- EC2 instances will be built on the default VPC
- We’ll use the Tokyo AWS region
(ISUCON AMIs might not be available in other regions)
Procedure
Here’s the environment setup procedure.
Completion Criteria
The environment setup described in this article is complete when you’ve confirmed the following:
- An EC2 spot instance is running
- You can connect to the EC2 instance using Session Manager
- You can access the application screen by hitting the Public IP
Overview of Steps
Here’s a rough overview of the steps:
- Preparation
- Create an Elastic IP (get a Public IP)
→ To access the application from your local PC - Create an IAM instance profile
→ To connect to the EC2 instance using Session Manager
- Create an Elastic IP (get a Public IP)
- Request a spot instance
- Click through the screens
- Verification
- Confirm the instance is running
- Connect using Session Manager
- Verify the application screen display
Detailed Procedure
Now let’s dive into the detailed procedure.
Preparation
Create an Elastic IP (get a Public IP)
Reference: https://docs.aws.amazon.com/ja_jp/AWSEC2/latest/UserGuide/elastic-ip-addresses-eip.html#working-with-eips
From EC2 > Network & Security > Elastic IP

Allocate an EIP.
Create an IAM instance profile
References:
- https://docs.aws.amazon.com/ja_jp/systems-manager/latest/userguide/systems-manager-setting-up.html
- https://dev.classmethod.jp/articles/ssm-session-manager-from-ec2-console-01/ (Not official but easy to understand)
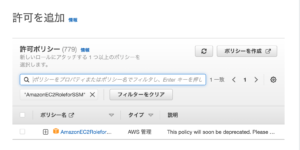
IAM > Role > Create role

Request a Spot Instance
EC2 > Spot Requests > Request Spot Instances
Keep most settings at their defaults. I’ll explain only the parts that need to be changed.
Specify the competitor’s AMI.
Note that if your region isn’t set to Tokyo, the AMI won’t appear.
AMI: ami-08ece261e7317422f
Reference: https://github.com/catatsuy/private-isu
Additional launch parameters – Open the options,

Select "Enable" to associate the EIP we created earlier.
Select "PerformanceTestRole" for the IAM instance profile.
If you’ve just created the EIP, the "Enable" option might not be available.
In that case, create the EC2 instance first, then associate the EIP.
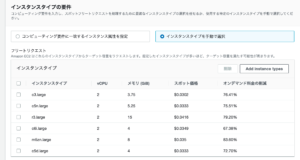
Next, select an instance type.
The book does not recommend burst-type t-series instances.
A C5.large with 2 cores was recommended.
If you’re just trying things out, you can choose a cheaper option.

After entering all the information, click "Create" to request a spot instance.
The instance will start booting up after a few minutes.
(If suitable instances aren’t available, it won’t start…)
Verification
Confirm the instance is running
Check that it’s running from the EC2 console.

Connect using Session Manager
EC2 > Instances > Connect to instance
Select Session Manager. Click "Connect" and if a prompt screen opens, that’s good.
Verify the application screen display
Check the public IPv4 address of your EC2 instance.
Try accessing it in your browser.
If the Iscogram screen opens, you’re done.

If the security group’s inbound configuration doesn’t allow communication from external IPs,
the screen above won’t display.
Change the security group settings associated with your EC2 instance.
Open a hole by configuring it to allow HTTP traffic (port 80) only from your home IP address, for example. (Don’t allow traffic from all IPs.)

The initial application setup is now complete.
(There are other settings like benchmarker configuration, but we’ll stop here for now.)
Bonus
It can be tedious to click through these settings every time and then delete everything when you’re done.
Creating and deleting resources with Terraform is easier.
Here’s a sample code:
provider "aws" {
  region = "ap-northeast-1"
}

resource "aws_iam_role" "performance_test_role" {
  name = "performance_test_role"
  path = "/"

  assume_role_policy = <<EOF
{
  "Version": "2012-10-17",
  "Statement": [
      {
          "Action": "sts:AssumeRole",
          "Effect": "Allow",
          "Principal": {
            "Service": "ec2.amazonaws.com"
          }
      }
  ]
}
EOF
}

resource "aws_iam_role_policy_attachment" "performance_test_attach" {
  role       = aws_iam_role.performance_test_role.name
  policy_arn = "arn:aws:iam::aws:policy/service-role/AmazonEC2RoleforSSM"
}

resource "aws_iam_instance_profile" "performance_test_profile" {
  name = "performance_test_profile"
  role = aws_iam_role.performance_test_role.name
}

resource "aws_spot_instance_request" "performance_test_instance" {
  ami = "ami-06c39e451ff9930db" // https://github.com/catatsuy/private-isu
  instance_type = "c5.large"
  spot_price    = "0.036"
  // Configure the instance to stop rather than terminate when the spot price exceeds your bid (so you can restart later)
  instance_interruption_behavior = "stop"
  spot_type = "persistent"

  iam_instance_profile = aws_iam_instance_profile.performance_test_profile.name

  tags = {
    Name = "performance_test"
  }
}

resource "aws_eip" "performance_test_eip" {
  instance = aws_spot_instance_request.performance_test_instance.spot_instance_id
  vpc      = true

  depends_on = [aws_spot_instance_request.performance_test_instance]
}

output "performance_test_instance_id" {
  value = aws_spot_instance_request.performance_test_instance.id
}

output "performance_test_spot_instance_id" {
  value = aws_spot_instance_request.performance_test_instance.spot_instance_id
}
Summary
In this article, we set up an application environment following "Web Performance Tuning by Experts."
If you want to see the next steps in configuration, please check:
https://gonkunblog.com/web-performance-handson-2/1289/
Don’t forget to delete your EC2 instance and other resources when you’re done.
Thank you for reading this far.


