


Introduction
I had heard that Datadog’s database monitoring feature was useful, so I gave it a try.
When I tried it out, I found myself thinking, “What should I do with the data? What should I do with the data? or “What do I do with the settings? I’m going to summarize them in this article.
The goal of this article is that the reader will be able to try the database monitoring function in 10 minutes.
Intended audience
- Those who are in a hurry
- People who want to try out what Datadog’s database monitoring can do
What you will get from this article
- Creating a MySQL dummy database
- How to install Datadog database monitoring (local)
- What you can do with Datadog database monitoring
Prerequisites
Please install the following in advance.
- Homebrew
Environment
- mac os Big Sur (m1)
- mysql Ver 8.0.30 for macos11.6 on x86_64 (Homebrew)
- DD_AGENT_VERSION=7.36.1
Main subject
Now let’s proceed to the main issue.
After installing MySQL and creating a dummy database
Then, we will start to configure Datadog.
Setting up the environment
Install MySQL and start the server.
$ brew install mysql
$ mysql --version
mysql Ver 8.0.30 for macos11.6 on x86_64 (Homebrew)
$ mysql.server start
Preparation of dummy data
Without a database to monitor, there is nothing you can do.
You can find a dummy database on the official MySQL website, so import it.
MySQL official site:https://dev.mysql.com/doc/index-other.html
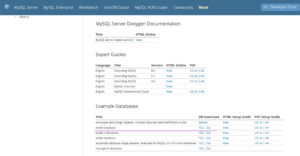
This time, I chose “world”.
Download the zip file and unzip it.
$ brew install mysql
$ mysql --version
mysql Ver 8.0.30 for macos11.6 on x86_64 (Homebrew)
$ mysql.server start
Place the extracted “world.sql” in an appropriate folder and import it.
Download and unzip the file with Zip.
mysql> SOURCE /Users/hogehoge/Downloads/world-db/world.sql
mysql> show databases;
+------------------------+
| Database |
+------------------------+
| world |
+------------------------+

mysql> use world
Database changed

mysql> show tables;
+-----------------+
| Tables_in_world |
+-----------------+
| city |
| country |
| countrylanguage |
+-----------------+
3 rows in set (0.01 sec)
Your data is now ready.
Datadog registration (free for 2 weeks)
Register for a trial of Datadog and obtain a datadog API key.
https://www.datadoghq.com/ja/free-datadog-trial/
Configure database monitoring
From here, we will add some more settings.
Basically, follow the official documentation below.
https://docs.datadoghq.com/database_monitoring/setup_mysql/selfhosted/?tab=mysql56
Configure database parameters
Configure mysql parameters.
設定ファイルの場所が分からない場合
~ ❯❯❯ mysql --help | grep my.cnf
order of preference, my.cnf, $MYSQL_TCP_PORT,
/etc/my.cnf /etc/mysql/my.cnf /usr/local/etc/my.cnf ~/.my.cnf
↑ 左から優先して読み込まれる

以下のファイルを編集。
/usr/local/etc/my.cnf
[mysqld]
# Only allow connections from localhost
bind-address = 127.0.0.1
performance_schema=on
max_digest_length=4096
performance_schema_max_digest_length=4096
performance_schema_max_sql_text_length=4096
performance-schema-consumer-events-statements-current=ON
performance-schema-consumer-events-waits-current=ON
performance-schema-consumer-events-statements-history-long=ON
performance-schema-consumer-events-statements-history=ONEdit my.cnf as above.
Then restart MySQL to reflect the parameters.
~/D/learn ❯❯❯ mysql.server restart
Shutting down MySQL ... SUCCESS!
Starting MySQL .... SUCCESS!
mysql> SHOW VARIABLES LIKE 'perf%';
| performance_schema | ON | を確認
Grant the Agent access to the database
Create a datadog user in mysql for datadog-agent to collect information.
The target database is assumed to be “world”.
If you are using a different database, you can replace the word “world” with “datadog”.
CREATE USER datadog@'%' IDENTIFIED WITH mysql_native_password by 'testhogehoge';
# 「testhogehoge」はパスワードのなので適宜設定してください
ALTER USER datadog@'%' WITH MAX_USER_CONNECTIONS 5;
GRANT REPLICATION CLIENT ON *.* TO datadog@'%';
GRANT PROCESS ON *.* TO datadog@'%';
GRANT SELECT ON performance_schema.* TO datadog@'%';

CREATE SCHEMA IF NOT EXISTS datadog;
GRANT EXECUTE ON datadog.* to datadog@'%';
GRANT CREATE TEMPORARY TABLES ON datadog.* TO datadog@'%';

DELIMITER $$
CREATE PROCEDURE datadog.explain_statement(IN query TEXT)
    SQL SECURITY DEFINER
BEGIN
    SET @explain := CONCAT('EXPLAIN FORMAT=json ', query);
    PREPARE stmt FROM @explain;
    EXECUTE stmt;
    DEALLOCATE PREPARE stmt;
END $$
DELIMITER ;

# データベース名は適宜設定してください
DELIMITER $$
CREATE PROCEDURE world.explain_statement(IN query TEXT)
    SQL SECURITY DEFINER
BEGIN
    SET @explain := CONCAT('EXPLAIN FORMAT=json ', query);
    PREPARE stmt FROM @explain;
    EXECUTE stmt;
    DEALLOCATE PREPARE stmt;
END $$
DELIMITER ;
GRANT EXECUTE ON PROCEDURE world.explain_statement TO datadog@'%';

DELIMITER $$
CREATE PROCEDURE datadog.enable_events_statements_consumers()
    SQL SECURITY DEFINER
BEGIN
    UPDATE performance_schema.setup_consumers SET enabled='YES' WHERE name LIKE 'events_statements_%';
    UPDATE performance_schema.setup_consumers SET enabled='YES' WHERE name = 'events_waits_current';
END $$
DELIMITER ;
GRANT EXECUTE ON PROCEDURE datadog.enable_events_statements_consumers TO datadog@'%';
Install the Agent
Install the datadog-agent locally and add the configuration.
After starting the datadog trial, follow the tutorial on installing the agent.
Reference: https://app.datadoghq.com/account/settings#agent
筆者が実行したInstallコマンドを参考までに貼っておきます
DD_AGENT_MAJOR_VERSION=7 DD_API_KEY=APIキーを入れる DD_SITE="us5.datadoghq.com" bash -c "$(curl -L https://s3.amazonaws.com/dd-agent/scripts/install_mac_os.sh)"

サンプルの設定ファイルをコピーしてきて使います。
ll /opt/datadog-agent/etc/conf.d/mysql.d/conf.yaml.example
cp /opt/datadog-agent/etc/conf.d/mysql.d/conf.yaml.example /opt/datadog-agent/etc/conf.d/mysql.d/conf.yaml
Add the Agent configuration to the following file
/opt/datadog-agent/etc/conf.d/mysql.d/conf.yaml
init_config:

instances:
  - dbm: true
    host: 127.0.0.1
    port: 3306
    username: datadog
    password: 'testhogehoge' # from the CREATE USER step earlier
~/D/l/datadog ❯❯❯ launchctl stop com.datadoghq.agent
~/D/l/datadog ❯❯❯ launchctl start com.datadoghq.agent
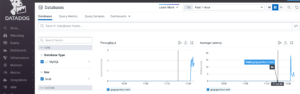
Confirmation of operation
Once you have set this up, database monitoring configuration is complete.
You should be able to monitor your local MySQL from the following.
https://us5.datadoghq.com/databases/
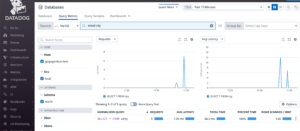
Let’s try to execute some SQL.
mysql -u root
mysql> use world;
mysql> select * from country;
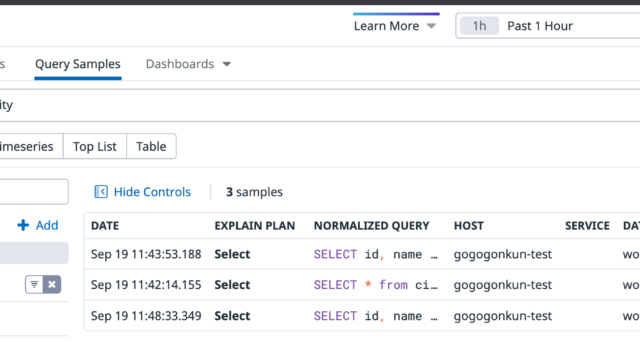
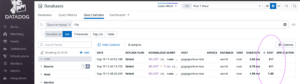
mysql> select * from city;You can now monitor it.
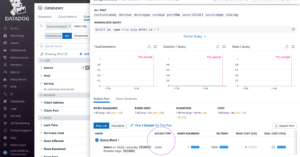
The Select I typed earlier is also there.
You can also see the results of Plan.
It will be easier to find Full Scan queries.
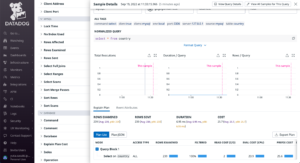
Let’s try some more queries for fun.
mysql> SELECT id, name from city WHERE name = "Nablus";
+------+--------+
| id   | name   |
+------+--------+
| 4078 | Nablus |
+------+--------+
1 row in set (0.00 sec)

mysql> SELECT id, name from city WHERE id = "4078";
+------+--------+
| id   | name   |
+------+--------+
| 4078 | Nablus |
+------+--------+
1 row in set (0.00 sec)
This is the query we just typed.
If you look at the PLAN result, you can also see that it is a full scan (ALL).
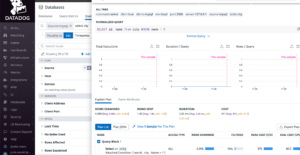
This is what it looks like when you specify the id directly.
I would like to try this with a huge DB.
It will be a great help in performance tuning.
Conclusion
This time, I tried database monitoring quickly.
In a word, it is useful!
Please give it a try.